2:10 split board with 15-14-12-5-10-14 locks
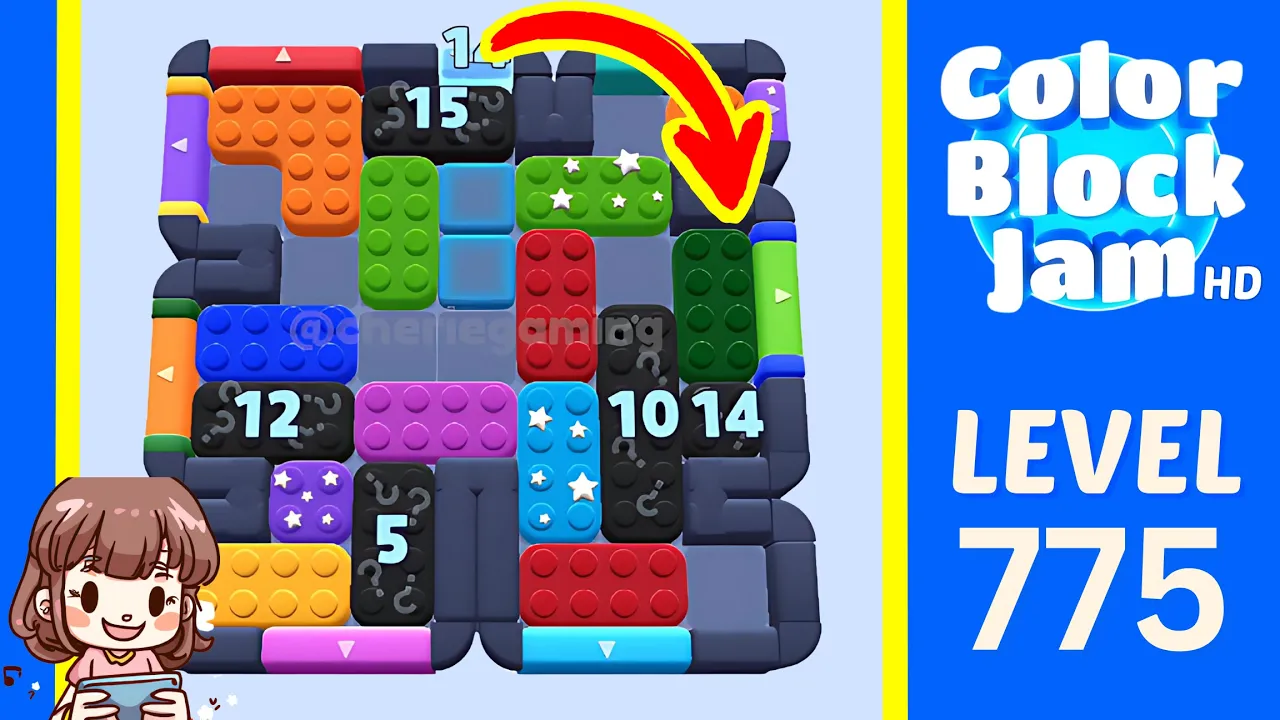
This solution matches Level 775 with a 2:10 timer and a split board whose opening lock pattern is 15 at the upper left, 14 at the top center, 12 on the left, 5 at the lower left, 10 near the center-right, and 14 on the far right. Use the narrow middle channels to trade one piece at a time between the two halves while keeping the lower exits open; the countdown blocks fall together as the route progresses. The verified run reaches the level-complete panel at about 1:57, before the Replay begins.
20 timestamped steps
Use each checkpoint to confirm that your board still matches the walkthrough.
Use these moments to confirm that your board still matches before continuing.
| Time | What to confirm |
|---|---|
| 0:04 | The walkthrough opens with a 2:10 timer and the Level 775 split-board lock pattern 15, 14, 12, 5, 10, and 14. |
| 0:35 | After the opening circulation, the six identifying counters have fallen to 14, 13, 11, 4, 9, and 13 by about 0:35. |
| 1:00 | A purple block clears through the left gate at about 1:00, opening the lower-left half for the second countdown phase. |
| 1:43 | The late circulation reduces the remaining top and side locks into single digits and releases several black countdown blocks between about 1:35 and 1:47. |
| 1:47 | The final chain clears cyan down, red up, yellow left, and the last cyan block up between about 1:47 and 1:56. |
| 1:57 | The level-complete panel appears at about 1:57, before the separately labeled Replay begins at about 2:03. |
Checkpoint: The full six-number pattern and the narrow middle channels match before the first move.
Watch at 0:04Checkpoint: The left-center channel is clear enough to pass a single block through it.
Watch at 0:10Checkpoint: Red no longer seals the middle-right channel and the cyan block can still move vertically.
Watch at 0:18Checkpoint: The lower-left counter is exposed and the black center counters can continue counting down.
Watch at 0:27Checkpoint: The visible counters read about 14, 13, 11, 4, 9, and 13 by 0:35.
Watch at 0:35Checkpoint: Both bottom gates remain open and the two halves can exchange one block at a time.
Watch at 0:47Checkpoint: Purple is directly beside its left exit while the surrounding locks have fallen into the low teens.
Watch at 0:57Checkpoint: Purple particles appear outside the left edge at about 1:00.
Watch at 1:00Checkpoint: The right half is open through the middle and the next lock cycle can complete.
Watch at 1:08Checkpoint: Yellow occupies the central row while blue has room to reach its gate later.
Watch at 1:19Checkpoint: The orange L no longer blocks the left gates and the right-side counters are exposed.
Watch at 1:31Checkpoint: Red particles appear above the board at about 1:39 and the remaining counters drop again.
Watch at 1:39Checkpoint: Several lock-release flashes appear by about 1:43 and the center lanes widen.
Watch at 1:43Checkpoint: Green particles appear outside the left edge and only low single-digit locks remain.
Watch at 1:45Checkpoint: Cyan particles appear below the board at about 1:47.
Watch at 1:47Checkpoint: Red is ready to exit upward and cyan has an unobstructed side route.
Watch at 1:50Checkpoint: Red particles appear above the board at about 1:51 and the final counter row falls to 1.
Watch at 1:51Checkpoint: Yellow particles appear outside the left edge at about 1:55.
Watch at 1:55Checkpoint: Cyan particles appear above the board at about 1:56 and the split board is empty.
Watch at 1:56Checkpoint: The level-complete panel appears at about 1:57; Replay begins around 2:03.
Watch at 1:57Each row links a visible gameplay fact to the walkthrough frame used to check it.
| Fact | Source role | Timestamp | Checked |
|---|---|---|---|
| The walkthrough opens with a 2:10 timer and the Level 775 split-board lock pattern 15, 14, 12, 5, 10, and 14. | CherieGaming walkthrough evidence | 0:04 | July 16, 2026 |
| After the opening circulation, the six identifying counters have fallen to 14, 13, 11, 4, 9, and 13 by about 0:35. | CherieGaming walkthrough evidence | 0:35 | July 16, 2026 |
| A purple block clears through the left gate at about 1:00, opening the lower-left half for the second countdown phase. | CherieGaming walkthrough evidence | 1:00 | July 16, 2026 |
| The late circulation reduces the remaining top and side locks into single digits and releases several black countdown blocks between about 1:35 and 1:47. | CherieGaming walkthrough evidence | 1:43 | July 16, 2026 |
| The final chain clears cyan down, red up, yellow left, and the last cyan block up between about 1:47 and 1:56. | CherieGaming walkthrough evidence | 1:47 | July 16, 2026 |
| The final chain clears cyan down, red up, yellow left, and the last cyan block up between about 1:47 and 1:56. | CherieGaming walkthrough evidence | 1:56 | July 16, 2026 |
| The level-complete panel appears at about 1:57, before the separately labeled Replay begins at about 2:03. | CherieGaming walkthrough evidence | 1:57 | July 16, 2026 |
It covers the 2:10 split board with the opening lock pattern 15, 14, 12, 5, 10, and 14 and the same narrow center channels.
The verified main run reaches the level-complete panel at about 1:57. The Replay begins later and is excluded.
No. The visible booster buttons remain unused throughout the verified run.
This walkthrough matches the Level 775 split board with a 2:10 timer and opening counters 15, 14, 12, 5, 10, and 14 in the same positions. If the lock pattern, pieces, or gate colors differ, use the Wrong Level tool instead of forcing this route.
Wrong level?