wooden 6, 9, and 4 countdown layout
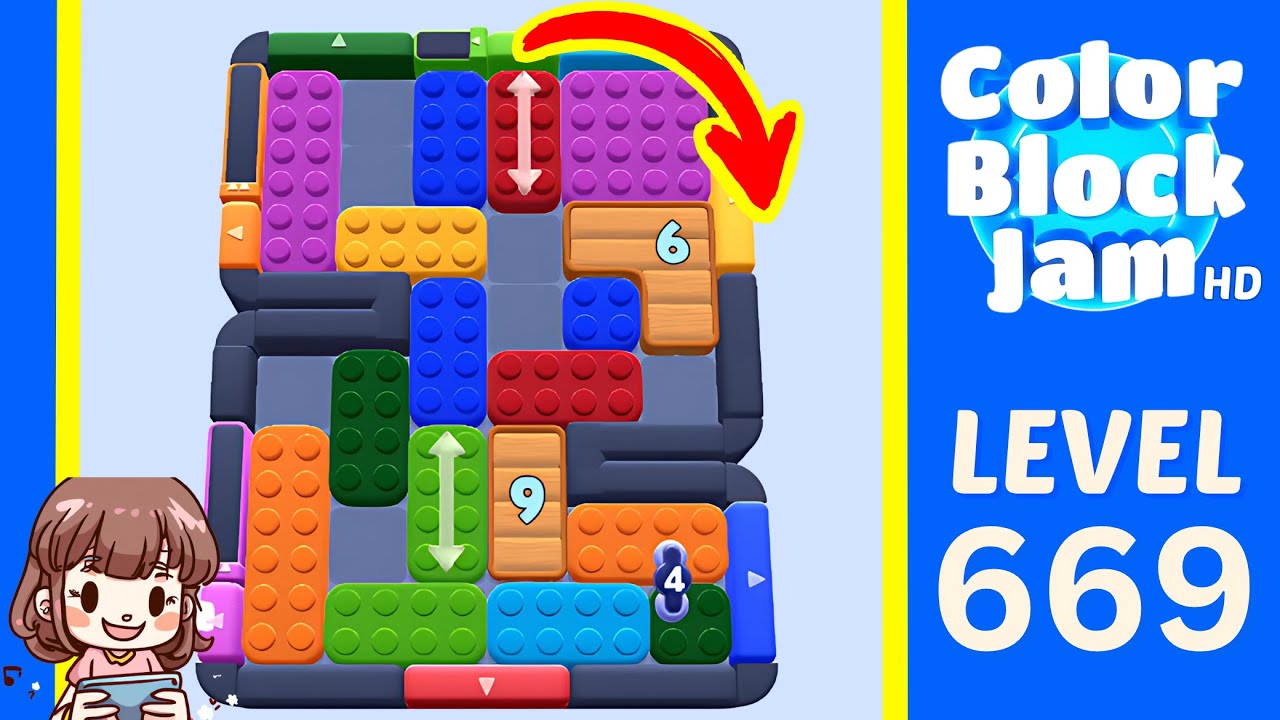
This solution matches the Level 669 board with wooden countdowns 6 at the upper right, 9 in the lower middle, and 4 at the lower right. Keep the red and green arrow lanes open while reducing all three countdowns, then follow the short final exit chain after the last wooden block clears at about 2:15. The first pass reaches the level-complete panel at about 2:33.
20 timestamped steps
Use each checkpoint to confirm that your board still matches the walkthrough.
Use these moments to confirm that your board still matches before continuing.
| Time | What to confirm |
|---|---|
| 0:06 | The walkthrough opens on Level 669 with wooden countdowns 6 at the upper right, 9 in the lower middle, and 4 at the lower right. |
| 0:38 | The first green block exits through the top at about 0:38, reducing the three countdowns to 5, 8, and 3. |
| 1:04 | A second green top exit at about 1:04 is followed by a red bottom exit at about 1:18 and another green top exit at about 1:22. |
| 1:33 | After another green top exit at about 1:30, the upper-right countdown clears and releases the concealed right-side pieces; the remaining center countdown falls to 3. |
| 2:15 | The final wooden countdown clears at about 2:15, opening the short endgame exit sequence. |
| 2:33 | The first solution pass reaches the level-complete panel at about 2:33. |
Checkpoint: The green arrow lane is exposed and all three countdowns still read 6, 9, and 4.
Watch at 0:08Checkpoint: The green vertical arrow can travel upward and the wooden 9 block is no longer boxed in on both sides.
Watch at 0:15Checkpoint: The green arrow is aligned below the top green gate while the red arrow lane remains open.
Watch at 0:28Checkpoint: The green arrow has a straight vertical route to the top edge.
Watch at 0:37Checkpoint: The three wooden countdowns read 5, 8, and 3 at about 0:38.
Watch at 0:38Checkpoint: The next green arrow is centered and the red block is clear of the top route.
Watch at 0:48Checkpoint: The second green arrow is directly beneath the top gate.
Watch at 1:03Checkpoint: The visible upper and center countdowns read 4 and 7 at about 1:04.
Watch at 1:04Checkpoint: Red points directly at the bottom red gate and green still has a route back to the top.
Watch at 1:17Checkpoint: The visible upper and center countdowns read 3 and 6 at about 1:18.
Watch at 1:18Checkpoint: The visible countdowns read 2 and 5 at about 1:22.
Watch at 1:22Checkpoint: The upper-right countdown reads 1 and the center countdown reads 4 at about 1:30.
Watch at 1:30Checkpoint: The upper-right wooden pocket has opened and the remaining center countdown reads 3.
Watch at 1:33Checkpoint: Only the center wooden countdown remains and it reads 2.
Watch at 1:45Checkpoint: The orange block points directly at the left gate and the remaining wooden countdown reads 2.
Watch at 2:00Checkpoint: The final wooden countdown falls to 1 at about 2:01.
Watch at 2:01Checkpoint: The last wooden block breaks at about 2:15 and the final colored pieces are fully accessible.
Watch at 2:15Checkpoint: Both purple blocks and the cyan block are gone by about 2:25.
Watch at 2:25Checkpoint: The board is empty after the blue exit at about 2:32.
Watch at 2:32Checkpoint: The level-complete panel appears at about 2:33.
Watch at 2:33Each row links a visible gameplay fact to the walkthrough frame used to check it.
| Fact | Source role | Timestamp | Checked |
|---|---|---|---|
| The walkthrough opens on Level 669 with wooden countdowns 6 at the upper right, 9 in the lower middle, and 4 at the lower right. | CherieGaming walkthrough evidence | 0:06 | July 14, 2026 |
| The first green block exits through the top at about 0:38, reducing the three countdowns to 5, 8, and 3. | CherieGaming walkthrough evidence | 0:38 | July 14, 2026 |
| A second green top exit at about 1:04 is followed by a red bottom exit at about 1:18 and another green top exit at about 1:22. | CherieGaming walkthrough evidence | 1:04 | July 14, 2026 |
| A second green top exit at about 1:04 is followed by a red bottom exit at about 1:18 and another green top exit at about 1:22. | CherieGaming walkthrough evidence | 1:18 | July 14, 2026 |
| A second green top exit at about 1:04 is followed by a red bottom exit at about 1:18 and another green top exit at about 1:22. | CherieGaming walkthrough evidence | 1:22 | July 14, 2026 |
| After another green top exit at about 1:30, the upper-right countdown clears and releases the concealed right-side pieces; the remaining center countdown falls to 3. | CherieGaming walkthrough evidence | 1:33 | July 14, 2026 |
| The final wooden countdown clears at about 2:15, opening the short endgame exit sequence. | CherieGaming walkthrough evidence | 2:15 | July 14, 2026 |
| The first solution pass reaches the level-complete panel at about 2:33. | CherieGaming walkthrough evidence | 2:33 | July 14, 2026 |
It covers the board that opens with wooden countdowns 6, 9, and 4 plus a red arrow near the top center and a green arrow in the lower half.
The wooden countdown areas conceal part of the board. Each matching exit lowers the counters, and reaching zero releases the pieces behind that wooden section.
Yes. The first pass completes at about 2:33, and a Replay begins around 2:39. This guide uses only first-pass timestamps.
This walkthrough matches the Level 669 board with wooden countdowns 6 at the upper right, 9 in the lower middle, and 4 at the lower right. If those values or the red and green arrow positions differ, use the Wrong Level tool instead of forcing these moves.
Wrong level?