2:15 stacked board with 70 bomb and 5-9-13-16 ice counters
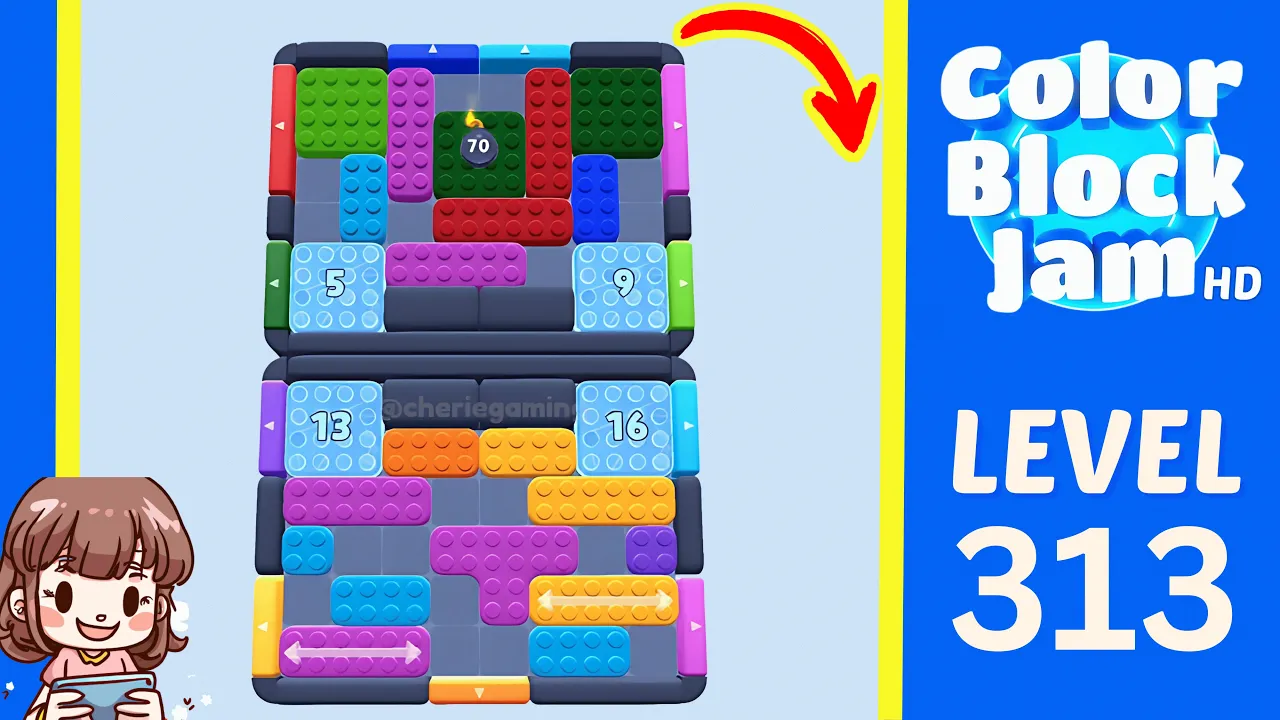
Match the 2:15 stacked board with the flaming 70 block and 5/9/13/16 ice counters. Clear the lower arrow bars and magenta pieces first to open the 5 lock, reorganize the upper board for red-left and cyan-up exits, use the next green/cyan exits to open the 9 lock and outlast the 70 countdown, then finish the 13 and 16 locks before emptying the lower board. The verified run reaches Level Complete at about 1:54; Replay starts at 2:01.
20 timestamped steps
Use each checkpoint to confirm that your board still matches the walkthrough.
Use these moments to confirm that your board still matches before continuing.
| Time | What to confirm |
|---|---|
| 0:04 | The walkthrough opens on Level 313 with a 2:15 timer, a flaming 70 countdown, and ice counters 5, 9, 13, and 16 across two vertically stacked boards. |
| 0:11 | The first matched magenta exit reduces the four ice counters to 4, 8, 12, and 15 by about 0:11. |
| 0:30 | The upper-board 5 ice lock releases during the fifth early exit cycle and its former space is open by about 0:30. |
| 1:05 | A cyan-up exit leaves the upper-right ice lock at 1, and the following green-left exit releases that lock by about 1:13. |
| 1:18 | The flaming 70 countdown completes during the upper-board phase and its number overlay is gone by about 1:18. |
| 1:30 | The lower 13 and 16 ice locks release around 1:29 and 1:35, and the level-complete panel appears at about 1:54 before Replay begins at about 2:01. |
Checkpoint: Every timer, counter, block group, and gate color matches before the first move.
Watch at 0:04Checkpoint: Magenta particles appear at the right edge and the counters become 4, 8, 12, and 15.
Watch at 0:08Checkpoint: The long yellow arrow bar has a clear horizontal lane to the left gate.
Watch at 0:14Checkpoint: Yellow particles appear on the lower-left edge and the counters reach 3, 7, 11, and 14.
Watch at 0:19Checkpoint: The counters visibly advance to 2, 6, 10, and 13.
Watch at 0:20Checkpoint: Right-side magenta particles appear and the counters read 1, 5, 9, and 12.
Watch at 0:24Checkpoint: The upper-board lower-left ice lock is gone by 0:30 and the other counters show 4, 8, and 11.
Watch at 0:28Checkpoint: Yellow particles appear and the remaining counters show 3, 7, and 10.
Watch at 0:33Checkpoint: The red horizontal and vertical pieces can both reach the left red gate.
Watch at 0:36Checkpoint: The left red lane is straight and unobstructed.
Watch at 0:42Checkpoint: Red particles appear and the live ice counters read 2, 6, and 9.
Watch at 0:52Checkpoint: The cyan piece has a clear upward path by about 1:03.
Watch at 0:54Checkpoint: Cyan particles appear above the board, the top-right ice counter shows 1, and the lower counters show 5 and 8.
Watch at 1:04Checkpoint: The top-right ice block is gone by about 1:13 and the lower locks read 4 and 7.
Watch at 1:06Checkpoint: The lower counters read 3 and 6 and the flaming 70 overlay has disappeared by about 1:18.
Watch at 1:14Checkpoint: Red particles appear around 1:23 and the lower counters read 2 and 5.
Watch at 1:20Checkpoint: After 1 and 4 are visible, the lower-left 13 ice lock shatters around 1:29 and the lower-right lock reads 3.
Watch at 1:25Checkpoint: The lower-right counter moves to 2, then 1, then disappears around 1:35.
Watch at 1:31Checkpoint: By about 1:46 only magenta or purple squares remain in the lower board.
Watch at 1:39Checkpoint: The last particles appear at about 1:53.5 and Level Complete appears at 1:54; stop before Replay at 2:01.
Watch at 1:46Each row links a visible gameplay fact to the walkthrough frame used to check it.
| Fact | Source role | Timestamp | Checked |
|---|---|---|---|
| The walkthrough opens on Level 313 with a 2:15 timer, a flaming 70 countdown, and ice counters 5, 9, 13, and 16 across two vertically stacked boards. | CherieGaming walkthrough evidence | 0:04 | July 15, 2026 |
| The first matched magenta exit reduces the four ice counters to 4, 8, 12, and 15 by about 0:11. | CherieGaming walkthrough evidence | 0:11 | July 15, 2026 |
| The upper-board 5 ice lock releases during the fifth early exit cycle and its former space is open by about 0:30. | CherieGaming walkthrough evidence | 0:30 | July 15, 2026 |
| A cyan-up exit leaves the upper-right ice lock at 1, and the following green-left exit releases that lock by about 1:13. | CherieGaming walkthrough evidence | 1:05 | July 15, 2026 |
| A cyan-up exit leaves the upper-right ice lock at 1, and the following green-left exit releases that lock by about 1:13. | CherieGaming walkthrough evidence | 1:13 | July 15, 2026 |
| The flaming 70 countdown completes during the upper-board phase and its number overlay is gone by about 1:18. | CherieGaming walkthrough evidence | 1:18 | July 15, 2026 |
| The lower 13 and 16 ice locks release around 1:29 and 1:35, and the level-complete panel appears at about 1:54 before Replay begins at about 2:01. | CherieGaming walkthrough evidence | 1:30 | July 15, 2026 |
| The lower 13 and 16 ice locks release around 1:29 and 1:35, and the level-complete panel appears at about 1:54 before Replay begins at about 2:01. | CherieGaming walkthrough evidence | 1:36 | July 15, 2026 |
| The lower 13 and 16 ice locks release around 1:29 and 1:35, and the level-complete panel appears at about 1:54 before Replay begins at about 2:01. | CherieGaming walkthrough evidence | 1:54 | July 15, 2026 |
It covers the 2:15 vertically stacked board with a flaming 70 countdown and four ice counters reading 5, 9, 13, and 16.
No Hard or Very Hard label is visible in the reviewed video. The stored difficulty therefore remains unknown even though the route is editorially suggested as hard.
No. The visible booster buttons remain unused throughout the verified main run.
This walkthrough only matches the Level 313 board with a 2:15 timer, a flaming 70 countdown on the dark-green upper block, and four ice counters 5, 9, 13, and 16 across a vertically stacked two-board layout. If any number, timer, board split, block arrangement, or gate color differs, use the Wrong Level tool instead of forcing this route.
Wrong level?