1:40 opening layout with center chain and 2/4/8/6 edge counters
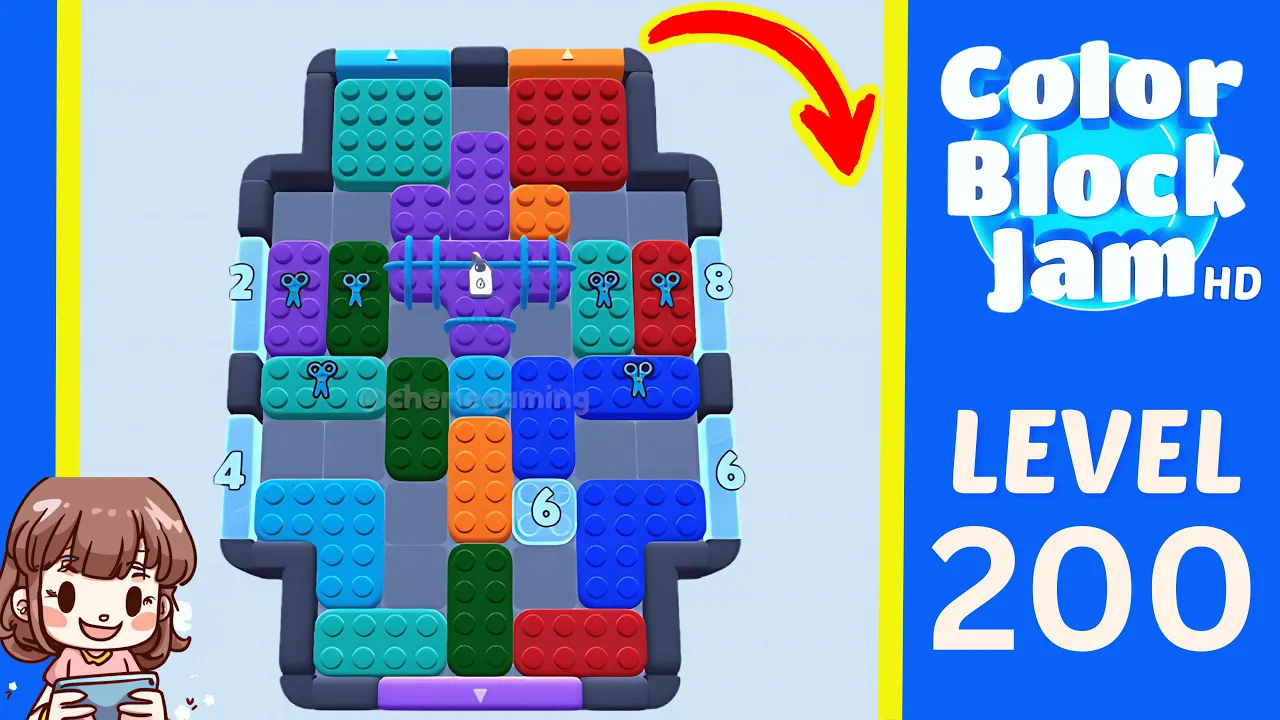
This Level 200 walkthrough matches the 1:40 opening layout with a chained center lock, edge counters 2, 4, 8, and 6, plus a lower numbered 6 block. Clear the upper and side counters first, keep the central chain accessible, then open the lower half and finish with the remaining top and bottom exits. The first level-complete panel appears at about 1:35, before the replay begins.
8 timestamped steps
Use each checkpoint to confirm that your board still matches the walkthrough.
Use these moments to confirm that your board still matches before continuing.
| Time | What to confirm |
|---|---|
| 0:05 | The walkthrough opens on Level 200 with a 1:40 timer, chained center lock, edge counters 2/4/8/6, and a lower numbered 6 block. |
| 0:30 | The early route reduces the right-side counters while keeping the center chain reachable. |
| 0:55 | The midgame keeps the chain area open while the lower half begins to clear. |
| 1:25 | The late route clears the chain and leaves only a few top, right, and bottom pieces. |
| 1:35 | The first solve reaches the level-complete panel at about 1:35. |
Checkpoint: The cyan top exit, orange top exit, purple bottom exit, left blue/red exits, and right green/cyan exits match the source layout.
Watch at 0:05Checkpoint: The center chain is still visible and the lower numbered 6 block has room to move later.
Watch at 0:15Checkpoint: The right counters have dropped toward 5 and 3.
Watch at 0:30Checkpoint: The left lower counter has dropped and the lower-left cyan area has space.
Watch at 0:40Checkpoint: The center chain is still reachable and the bottom pieces have room to slide.
Watch at 0:55Checkpoint: The chain is gone and the center of the board is mostly empty.
Watch at 1:10Checkpoint: Only the last bottom or side pieces remain.
Watch at 1:25Checkpoint: The level-complete panel appears at about 1:35.
Watch at 1:35Each row links a visible gameplay fact to the walkthrough frame used to check it.
| Fact | Source role | Timestamp | Checked |
|---|---|---|---|
| The walkthrough opens on Level 200 with a 1:40 timer, chained center lock, edge counters 2/4/8/6, and a lower numbered 6 block. | CherieGaming walkthrough evidence | 0:05 | July 16, 2026 |
| The early route reduces the right-side counters while keeping the center chain reachable. | CherieGaming walkthrough evidence | 0:30 | July 16, 2026 |
| The midgame keeps the chain area open while the lower half begins to clear. | CherieGaming walkthrough evidence | 0:55 | July 16, 2026 |
| The late route clears the chain and leaves only a few top, right, and bottom pieces. | CherieGaming walkthrough evidence | 1:25 | July 16, 2026 |
| The first solve reaches the level-complete panel at about 1:35. | CherieGaming walkthrough evidence | 1:35 | July 16, 2026 |
Yes. The opening frame visibly shows Level 200 with a 1:40 timer.
No. The reviewed source shows the level, layout, and completion, but it does not show a visible in-game Hard or Very Hard label, so this guide keeps the difficulty as unknown.
The first level-complete panel appears around 1:35 in the CherieGaming source video, before the replay begins.
This walkthrough matches the Level 200 board with a 1:40 timer, center chained lock, left counters 2 and 4, right counters 8 and 6, and a lower numbered 6 block. If your counters or chain placement differ, use a guide for that layout instead.
Wrong level?