12, 9, 8, and 3 opening layout
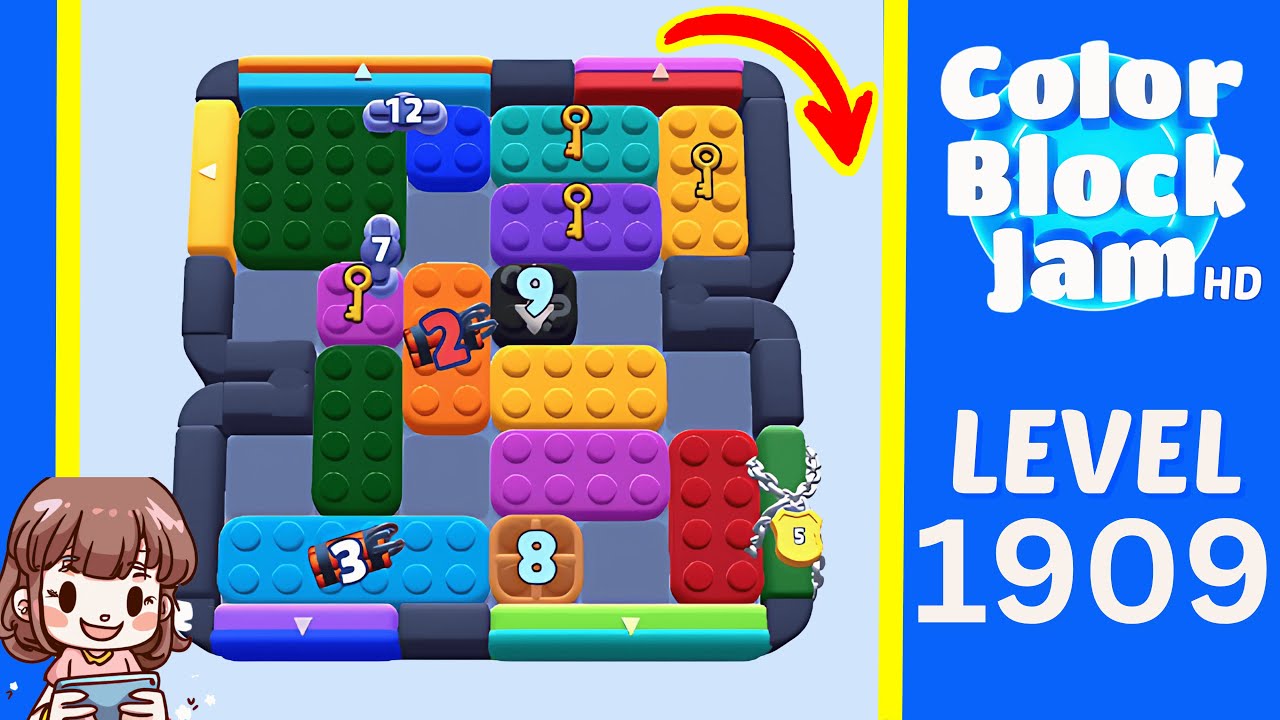
This solution matches the Level 1909 layout with the 12 block near the top, 9 in the center, 8 at the lower middle, and 3 near the lower-left lane. Open the top red route first, keep the lower countdown lane clear, clear yellow and purple through their side exits, then finish the orange and green bottom exits before the level-complete panel at about 1:45.
16 timestamped steps
Use each checkpoint to confirm that your board still matches the walkthrough.
Use these moments to confirm that your board still matches before continuing.
| Time | What to confirm |
|---|---|
| 0:05 | The walkthrough gameplay frame visibly opens on the Level 1909 board. |
| 0:15 | The early solve opens the top route and sends a red block out through the upper red exit. |
| 0:45 | By the middle of the solve, the lower countdowns have dropped to 6 and 7 while the left and right lanes remain open. |
| 1:20 | The late solve routes the tall yellow block down the left side and the purple block through the right-side path. |
| 1:35 | The final sequence clears the orange bottom piece, the purple upper/right piece, and the remaining green block. |
| 1:45 | The walkthrough reaches the level-complete panel at about 1:45 in the first run. |
Checkpoint: The top red exit, right yellow exit, bottom purple and green exits, and the central 9 block are all visible.
Watch at 0:05Checkpoint: The red top exit clears while the center still has room around the 9 block.
Watch at 0:15Checkpoint: The orange piece is in the center and the lower 8 lane is not sealed off.
Watch at 0:20Checkpoint: The lower middle still shows the 8 block with a usable path on both sides.
Watch at 0:25Checkpoint: The board has opened on the right and the lower counters show 6 and 7.
Watch at 0:35Checkpoint: Cyan sits across the left side and the lower 6 and 7 lane is still open.
Watch at 0:45Checkpoint: The tall yellow block is staged low, and purple remains reachable on the right.
Watch at 0:55Checkpoint: Purple has a right-side route and the lower counters are still visible.
Watch at 1:05Checkpoint: The right pocket is open and the lower counters read about 5 and 6.
Watch at 1:10Checkpoint: The lower-left countdown has dropped to 4, with the right-side purple route still available.
Watch at 1:15Checkpoint: Yellow is low on the left and the remaining visible counters are 3 and 4.
Watch at 1:20Checkpoint: Orange is staged near the bottom and purple is no longer trapped by the green block.
Watch at 1:30Checkpoint: Orange has left the board and purple exit particles appear near the upper-right path.
Watch at 1:35Checkpoint: Only the final green block remains on a mostly empty board.
Watch at 1:40Checkpoint: The last block leaves and the board is cleared.
Watch at 1:43Checkpoint: The level-complete panel appears at about 1:45, confirming Level 1909 is finished.
Watch at 1:45Each row links a visible gameplay fact to the walkthrough frame used to check it.
| Fact | Source role | Timestamp | Checked |
|---|---|---|---|
| The walkthrough gameplay frame visibly opens on the Level 1909 board. | CherieGaming walkthrough evidence | 0:05 | July 16, 2026 |
| The early solve opens the top route and sends a red block out through the upper red exit. | CherieGaming walkthrough evidence | 0:15 | July 16, 2026 |
| By the middle of the solve, the lower countdowns have dropped to 6 and 7 while the left and right lanes remain open. | CherieGaming walkthrough evidence | 0:45 | July 16, 2026 |
| The late solve routes the tall yellow block down the left side and the purple block through the right-side path. | CherieGaming walkthrough evidence | 1:20 | July 16, 2026 |
| The final sequence clears the orange bottom piece, the purple upper/right piece, and the remaining green block. | CherieGaming walkthrough evidence | 1:35 | July 16, 2026 |
| The final sequence clears the orange bottom piece, the purple upper/right piece, and the remaining green block. | CherieGaming walkthrough evidence | 1:40 | July 16, 2026 |
| The walkthrough reaches the level-complete panel at about 1:45 in the first run. | CherieGaming walkthrough evidence | 1:45 | July 16, 2026 |
The YouTube title says Level 1001 (1909), but the gameplay frame itself visibly shows Level 1909. This page is written for the Level 1909 board shown in the video.
Yes. The first run reaches the level-complete panel at about 1:45, and the replay segment completes the same board again near the end of the video.
This source does not show a visible in-game Hard or Very Hard label, so the guide does not assign a difficulty rating.
This walkthrough matches the Level 1909 board shown in the CherieGaming video titled Level 1001 (1909). If your opening board does not show the 12, 9, 8, and 3 countdown layout, do not force these moves.
Wrong level?