2:20 board with cyan and orange top exits, magenta and yellow bottom exits, and central fixed blockers
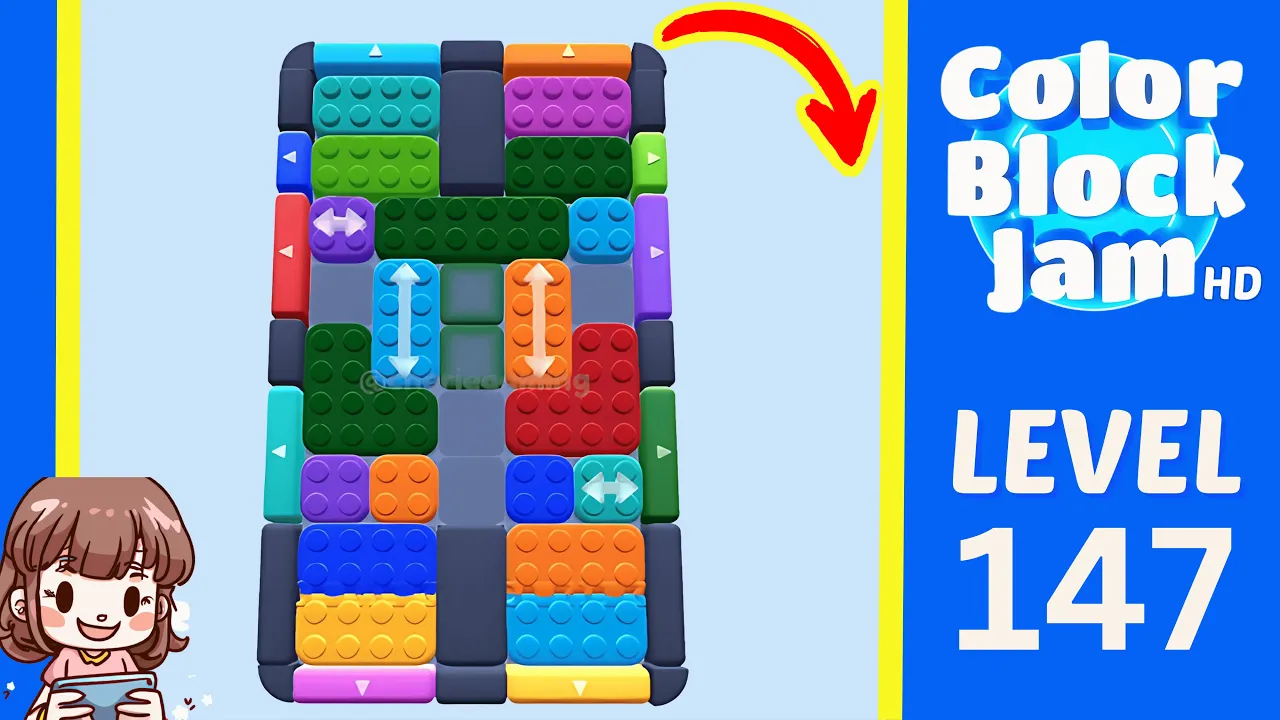
Confirm Level 147 with the 2:20 timer and the cyan/orange top exits before moving. Start by freeing the lower cyan lane, keep the center gap open for the red and green L blocks, then finish the upper and bottom exits before Level Complete appears around 2:05.
12 timestamped steps
Use each checkpoint to confirm that your board still matches the walkthrough.
Use these moments to confirm that your board still matches before continuing.
| Time | What to confirm |
|---|---|
| 0:05 | The first playable frame shows Level 147, timer 2:20, and the verified board-147-a layout. |
| 0:18 | The early route starts by repositioning the lower cyan block and opening the lower-middle lane. |
| 0:58 | The green L block moves through the center-left corridor once the middle has enough room. |
| 1:25 | Upper cyan and green pieces begin feeding toward their exits while the orange vertical and red L remain movable. |
| 2:00 | The board is nearly empty after the final exit sequence begins. |
| 2:05 | Level Complete appears around 2:05 with about 0:25 remaining. |
Checkpoint: The right-lower pocket opens.
Watch at 0:08Checkpoint: Space opens beside the cyan vertical.
Watch at 0:12Checkpoint: The lower-middle row is clear.
Watch at 0:17Checkpoint: The red L block has room to move.
Watch at 0:24Checkpoint: The right-side corridor starts to open.
Watch at 0:31Checkpoint: The orange vertical remains movable and the center is not jammed.
Watch at 0:36Checkpoint: The upper-left and center-left lanes are usable.
Watch at 0:52Checkpoint: Top-left pieces can start exiting.
Watch at 1:09Checkpoint: The upper half becomes mostly empty.
Watch at 1:24Checkpoint: The bottom stacks are accessible.
Watch at 1:41Checkpoint: Only final colored blocks remain.
Watch at 1:55Checkpoint: Level Complete confirms the successful first-run completion.
Watch at 2:04Each row links a visible gameplay fact to the walkthrough frame used to check it.
| Fact | Source role | Timestamp | Checked |
|---|---|---|---|
| The first playable frame shows Level 147, timer 2:20, and the verified board-147-a layout. | CherieGaming walkthrough evidence | 0:05 | July 16, 2026 |
| The early route starts by repositioning the lower cyan block and opening the lower-middle lane. | CherieGaming walkthrough evidence | 0:18 | July 16, 2026 |
| The green L block moves through the center-left corridor once the middle has enough room. | CherieGaming walkthrough evidence | 0:58 | July 16, 2026 |
| Upper cyan and green pieces begin feeding toward their exits while the orange vertical and red L remain movable. | CherieGaming walkthrough evidence | 1:25 | July 16, 2026 |
| The board is nearly empty after the final exit sequence begins. | CherieGaming walkthrough evidence | 2:00 | July 16, 2026 |
| Level Complete appears around 2:05 with about 0:25 remaining. | CherieGaming walkthrough evidence | 2:05 | July 16, 2026 |
No visible in-game Hard or Very Hard label appears in the reviewed source.
Follow the first run from about 0:05 to 2:05; the later Replay section is corroboration only.
Use this guide only for the board with the 2:20 timer, cyan/orange top exits, and the same central fixed blockers.
If your Level 147 board does not match the 2:20 timer, cyan/orange top exits, magenta/yellow bottom exits, and central fixed blockers, use the source only as a reference and check another layout first.
Wrong level?